Lately I have been seeing so many cute DIY Family Birthday Boards on Pinterest. Being that I have an awful memory, especially with dates, I just knew I needed to make one.
I bought a 5.5" x 24" board from Home Depot and spray painted it black. Next I added a vinyl decal I made with "Dates to Remember" and the months... and then took a pack of wooden circles I painted various colors and added the special dates to. I attached all of the circles with jump rings and hung from an eye hook at the bottom of the wood.
Easy Peasy!!! Want to make one? I can supply the decals... you supply the hardware and time.
Thursday, December 27, 2012
Wednesday, December 5, 2012
Dear Santa Printable
Before you read any further, please note that this my be a bit controversial to some... but they are my honest thoughts.
My daughter somehow learned all about Santa this year without me even saying a word about the jolly fella. Honestly, I wasn't even sure if I was going to do the whole "Santa" thing with her... even though I LOVE Christmas time. Being that she is too young to understand about the MAGIC of Santa and I do not want her to innocently spoil the fun for someone else, I feel like I have to go along with it. Bitter Sweet!!!
She recently mentioned wanting to write a letter to Santa. I started to plan a little "Dear Santa" play date with her and her friends to do a few crafts and create their letters (which has since turned into an official Toddler Tuesday event at Jax Couture Events & Boutique).
Since she's three and I wasn't too sure if he would be able to read her "handwriting" yet so I made her a letter template that she could draw her list to him.
If you would like a copy of this printable for your little, please e-mail me: ten23designs@gmail.com
Sunday, November 25, 2012
Now it all makes sense...
No
fireplace? No problem!! Elves Only Access Doors explains one of life's
greatest mysteries... how does the elf get in the house?
Sunday, November 11, 2012
Wooden Monogram : Holiday Cut-Off
Christmas cut-off for the wooden cut out monograms is currently November 20th. Be sure to get your orders in soon.
If you are wanting the smaller 4" and 6" single letters to add to stockings and gifts, please be sure to send in those orders this week so you can get them well before Christmas.
Sizes range from 10" - 36"
If you are wanting the smaller 4" and 6" single letters to add to stockings and gifts, please be sure to send in those orders this week so you can get them well before Christmas.
Friday, November 9, 2012
A Place For Everything...
...and everything in it's place.
I am still working towards my goal of being completely organized. Yesterday, I saw this great pin on Pinterest and adding to my project list to help me on my organization mission.
Here is my own take on the project... with decals of course!
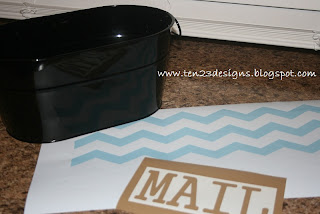
I took a solid black bucket, a chevron pattern decal I cut and the word MAIL, also a decal I cut. Before I go any further, let me first tell you that the most difficult part of this project was selected the font for the word MAIL.
I added the chevron pattern decal first...
Then added the MAIL decal...
I am still working towards my goal of being completely organized. Yesterday, I saw this great pin on Pinterest and adding to my project list to help me on my organization mission.
Here is my own take on the project... with decals of course!
I added the chevron pattern decal first...
Then added the MAIL decal...
... and viola!!!
I think it makes a nice touch... what do you think?
Thursday, November 1, 2012
Monday, October 15, 2012
Now that's a BIG ruler!!
It's not a big secret... I like BIG things. No wait... I LOVE over-sized things!!! I know that most over-sized things are not practical :: (like my 2 foot scissors, jumbo clothes pin or super sized pencil that I can hardly hold)!
So last year, to make this world a little more complete, I just had to add a giant ruler growth chart decal set to my collection.
Since posting my own ruler project for my family, I have had tons of orders for people wanting to make their own.
Here are two completed project photos I have gotten back from happy clients.
If you would like your own giant ruler growth chart decal set, I'd be happy make you one... any color, and font and even personalized for FREE! ...and if you make one, I would love to see a photo!!
Thursday, September 27, 2012
Trunk or Treat 2011 :: Angry Birds Edition
...another trip down the Halloween memory lane...
The time: 2011
The place: The Donia (our church)
The setting: Trunk or Treat
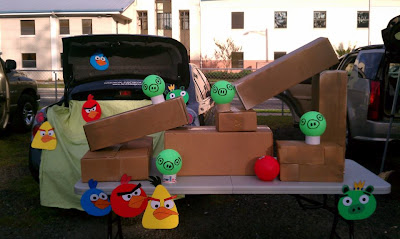
The game :: ANGRY BIRDS
Let me start by saying that I seriously think my son (13 at the time) and I had as much fun putting this all together as the kids had playing it.
The game was completely interactive with the ANGRY BIRDS bouncing all over the place. It was a lot of fun.
We used small "kick balls" for all of the green pigs and Angry Birds to launch. I cut all of the Angry Birds on display out of poster board. The "wooden" pieces are all spray painted boxes that I later actually used to ship orders. We don't waste around here!
A Spooky Halloween Upcycle Project
Salsa, pasta sauce, alfredo, dressing... oh my!! Not such a great combo. Unless of course you are upcycling the jars to become a fun Halloween Spooky project!!
{Two years ago}
My son and I (mostly my son), added colored tissue paper to the OUTSIDE of the jars using mod podge. I then added the spooky decal faces and the candles inside. They have a fun glow to them.
{Two years ago}
My son and I (mostly my son), added colored tissue paper to the OUTSIDE of the jars using mod podge. I then added the spooky decal faces and the candles inside. They have a fun glow to them.
Saturday, September 22, 2012
{Custom Decals :: Party Edition}
A good friend of mine was throwing her soon to be 2 year old a Sesame Street birthday party at the hands on museum. She found everything she needed except for the favor bags... decals to the rescue!!!
Monday, September 17, 2012
You've Been Boo'D
{Recap from last Halloween}
So tonight my son and I had some fun boo'ing a couple neighbors. I found a few printables for Boo'ing online but decided to design my own... to add my personal touch! It was supposed to a fun, anonymous type thing, but both neighbors new I was the culprit. It was still fun... and we are looking forward to doing a few more.
So tonight my son and I had some fun boo'ing a couple neighbors. I found a few printables for Boo'ing online but decided to design my own... to add my personal touch! It was supposed to a fun, anonymous type thing, but both neighbors new I was the culprit. It was still fun... and we are looking forward to doing a few more.
After
attempting to boo one of the neighbors, my son ran back into the house
full of giggles. He said he was getting ready to leave the boo bag at
the door and when he looked up, he saw their door was open (they have a
glass door before the front door). He ran in here yelling, "abort mission! I've been compromised!!"
One
of best part of boo'ing the neighbors for me was having to call my
husband on the way home from work and asking him to pick up mini
marshmallows. He asked what I needed them for and I told him... ghost
poop. When he got home, he handed me the bag and said, "here's your
ghost poop."
It was fun... I would recommend this fun Halloween activity for everyone with little ones... even a 13 year old like mine.
Monday, September 10, 2012
Fun & Practical Play Time
Owning my own home based business and having a 3 year old home with me during the day is not an easy task. I actually do not get much work done during the day at all. During her "work" time, I sit her desk next to mine and have her do worksheets. Other than that, my "work" day is really non-existent. Then there are the days I have to get something done but she wants to play... and usually outside. As much as I am family first, a work dead-line is a dead-line so I must get it done. So we must improvise...
Today she wanted to go outside and play hopscotch...
My solution: An indoor hopscotch floor decal in the living room, which can be easily covered up by the area rug when she is all done. While my vinyl is cutting on the machine, I can even play a few rounds with her.
Win | Win
Today she wanted to go outside and play hopscotch...
My solution: An indoor hopscotch floor decal in the living room, which can be easily covered up by the area rug when she is all done. While my vinyl is cutting on the machine, I can even play a few rounds with her.
Win | Win
Tuesday, August 14, 2012
Time to go to the library...
I have been taking my 3 year old to the library for story time and she finally realized she can check out books while she is there. Of course she couldn't pick just one book, so I decided to make her a handy dandy tote bag to take back and forth to the library... complete with a chalkboard label for the due date.
My rule is that she can fill the bag but nothing more. The bag sits in the living room and only one book can come out at a time. Let's hope this helps us to not pay any library fines.
My rule is that she can fill the bag but nothing more. The bag sits in the living room and only one book can come out at a time. Let's hope this helps us to not pay any library fines.
Monday, July 16, 2012
{Introducing} Wedding Tumblers
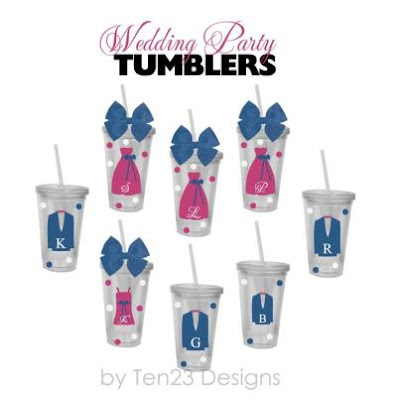
Wedding season always brings many brides looking for something fun, cute, useful and personalized to give as wedding party gifts. My personalized tumblers has been a favorite for gift giving since I introduced them so I thought it was time to add some specially for the wedding crowd.
Each tumbler can be customized with any color combination. Special personalizations are also available. The initials can also be replaced with wedding party titles: Bride, Groom, Made of Honor, etc...
Each tumbler can be customized with any color combination. Special personalizations are also available. The initials can also be replaced with wedding party titles: Bride, Groom, Made of Honor, etc...
Labels:
gifts and goodies,
personalize,
personalized,
tumblers,
wedding
Count Your Blessings
Last October I wanted to make some sort of "blessing" board. I wasn't sure what exactly I wanted to do but I knew I wanted to do something and have it ready by November... Well October rolled on by... and then November.
I went with the dry erase method by using a glass frame.
It was pretty easy to make and has a lot of meaning... I like those kind of projects.
I started off with a 14" x 26" photo collage frame... and removed the collage mat from behind the glass.
I went with the dry erase method by using a glass frame.
It was pretty easy to make and has a lot of meaning... I like those kind of projects.
I started off with a 14" x 26" photo collage frame... and removed the collage mat from behind the glass.
I picked up some nifty beige burlap (I think that is what this is called) from the fabric store... with some extras to make a few extra and some cool decor projects.
I put the burlap behind the glass... which was the most challenging part of this project.
I cut a decal with "Count your Blessings" with numbers 1 - 10
And viola!
You can also replace "Count your Blessings" with another saying if you wish (ie; My Favorite Things, What's for Dinner?)
Labels:
client photo,
customer photo,
decal,
diy,
holiday,
home
Sunday, July 15, 2012
{Real Event} "Color Me Happy" Birthday
It all started with a scribble...
I asked my (then) 2 year old what kind of birthday she wanted to have this year. She told me she wanted to color and have her friends color too. I looked up coloring theme parties but nothing really jumped out at am. So I turned to the birthday girl and asked her, "what kind of coloring party" to try to narrow it down. She said like this and ran off to get a crayon and piece of paper and began to draw. I knew just what to do after that...
I gave her some cardstock and a Sharpie marker and let her do some drawing...
I took the drawings she made, scanned them and then turned into graphic files... which I then turned into decals.

I covered an area in butcher paper as the white canvas backing. I bought a huge roll so she can continue to use it for coloring.

This sign in book is just like the one I made last year for Mya's birthday but with this year's theme. I used decals and my printables to make it.
AshleyandGary Kennedy of Kennedy Kakes baked the yummy cake, cookie pops, cake pops and cake push pops!
I found this yummy treat on Pinterest and just used rainbow dot sprinkles to add color to them.
Cookie pops & cake pops by Kennedy Kakes
I made a cartoon version of Mya that I added to her favors and things.
Rainbow fruits & veggies to balance some of the sweets
Close up of her cartoon self
And here she is with the matching outfit I made for her. Making that skirt may have been the most difficult part of this entire party.
At the park...
My neighbor, owner of Who Baby Who, made colorful tissue paper pom poms to decorate with. This is the coloring table with coloring pages of her cartoon self to color.
I added the scribble decals to just about everything
My very creative friend, Robin, of Heartmade by Hand made these awesome paint chip notebooks as part of the favors.
More scribble decals
The birthday girl...
...having fun on the slide.
Labels:
client photo,
custom,
customer photo,
decal,
family,
kids,
personalize,
personalized,
printable
The family behind Ten23 Designs
Everyone has their own special job to help bring you all the pretties. My son (left - 14), helps tape decals and makes boxes, he is also learning how to do design work. My husband (right) tapes boxes and helps peel decals. My daughter (center -3), puts those bright neon "Do Not Crush" stickers on the boxes and those who get a pretty crayon drawing on your box, that would be her art as well.
Ten23 Designs is a mom-owned, family run business. When you support Ten23 Designs, you are supporting a family... and helping to make dreams come true.
(Thank you Christy Whitehead Photography for taking this very last minute photo for us last night).
Monday, July 9, 2012
Decals and Burlap???
Earlier today, Cocktails & Details posted a beautiful inspiration collection of woods, metals and burlap on Facebook... and it inspired me.
I love anything personalized and burlap happens to be one of my favorite decorating materials... so why not mix the two?
One of the good things about being a craft addict is that 9 times out of 10, you have all of the materials you need right in your studio when an idea unleashes in your mind... especially if you are like me and cannot do anything else until the project is complete.
I first sewed two small pillows with the burlap material, leaving a corner on each open to stuff.
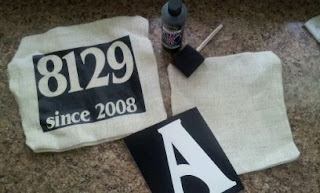
I cut the decals and peeled out the lettering to make a stencil. I used the application tape to adhere the vinyl on the burlap how I wanted it.
Then painted.
After it dried (didn't really let it dry all of the way... I was to anxious to get it done)... My assistant helped me to stuff the pillows.
She smiled almost the whole time and said to me, "this is fun. Can we make more pillows?"
After we stuffed them I stitched up the open corner and viola!!!
Labels:
customer photo,
inspire me,
monogram,
personalize,
personalized,
tutorial,
wedding
Subscribe to:
Posts (Atom)


